

Have you ever been compelled to make a how-to video or record a segment of a livestream? Did you know that you can perform all of this on your Mac without having to install any other software by utilizing the built-in screen recorder?
We’ll walk you through the specific steps you can use to record your Mac’s screen using the built-in screen recorders in this article.
And there’s more. Stay with us until the finish, and we’ll teach you how to utilize an easy-to-use web editor like InVideo to edit your screen recordings and make them into thumb-stopping PRO films.
What you’ll learn is as Follows:
- How can you use the Screenshot function on my Mac to record my screen?
- How can you use QuickTime Player to screen records on a Mac?
- How do you record video on a Mac?
How Can you use the Screenshot function on Mac to record screen?
From 2018, Apple’s Mojave operating system included a screen recording function in the form of an app named Screenshot. If your machine is running a MacOS version after Mojave or Catalina, you can record your screen by following these steps:
Move 1: To open the Screenshot app, hold shift + cmd + 5 at the same time.
Move 2: At the bottom of your screen, you’ll see a control bar with screenshot and screen recording choices. The screen recording choices are the two icons with a little circle in the corner—to record the entire screen or only a portion of it.
")
Move 3:
When you select “Record Selected Portion,” a window appears where you may enlarge the portion you wish to record.
")
Move 4:
Click “Options” once again to set other video options, such as the microphone for sound, the place for saving it, and a timer if necessary.
")
Move 5:
Press the “Record” button when you’re ready. If you’re recording the entire window, click anywhere on the screen. If you’ve set a timer, wait for the countdown to finish before starting the recording.
")
Move 6:
To stop recording, press control + command + esc at the same time, or click the stop symbol in the upper right corner of your screen, or press command + shift + 5 to bring up the control bar and click the stop button there.
")
Your video will display as a thumbnail in the bottom right corner of your screen as soon as you stop recording.
")
Your video will be saved as a QuickTime movie on your desktop if you don’t click or move it around.
Press the spacebar on your keyboard to preview the video.
On a Mac, how do you reduce your screen recorded video?
You have the ability to alter the video after the thumbnail of your screen recording displays. If the thumbnail vanishes, double-click the video on your desktop to access your recording.
Step 1:
After you’ve opened the video, go to the upper left corner of your screen and select “Edit,” then “Trim.”
")
Step 2:
Select your start and finish locations with the slider at the bottom, then click “Trim.” The altered video will take the place of the one currently on your desktop.
")
Using QuickTime Player to screen record on a Mac
While most Mac users are familiar with QuickTime Player as a video player, it can also be used as a screen recorder. Most Mac devices come with the software pre-installed, but you can always get it from the App Store.
Here’s how to use QuickTime Player to screen record on a Mac:
Step 1:
Launch QuickTime Player and select “File” from the upper left corner of the screen. “New Screen Recording” will appear.
")
Step 2.
To configure your options for the microphone, cursor, storing location, and timer, go to “Options.”
")
Step 3:
Select an option—record the full screen or a piece of it—and press “Record.”
")
Step 4:
When you’re finished recording, go to the top menu and select the stop symbol.
")
Your recorded video will be stored to your desktop as a result of this. If you wish to cut it, follow the same steps you used to trim a video captured with the Screenshot app.
Pro tip: You may simply modify your video using InVideo’s online video editor once you’ve filmed it. This article will show you how to effortlessly modify a video with InVideo.
You can also learn from this video
Using your webcam to record a video on Your Mac
It’s just as simple to record a video using your Mac’s camera as it is to capture your screen.
On a Mac, you may record a video using iMovie, Photo Booth, or QuickTime Player.
All of these applications come pre-installed on Mac devices, but you can always download them if you don’t have them.
“Create a video with iMovie”
Step 1:
To make a new video, open the iMovie app and select New Project > Movie.
")
Step 2:
Select “Import Media” from the drop-down menu.
")
Step 3:
Select “FaceTime HD Camera” from the left side.
To begin recording, press the record button when you’re ready.
Click the same button to terminate the recording when you’re finished.
Step 4:
Your film will appear in the iMovie project library automatically.
Drag it down to the editing panel and use the sliders to trim the start and finish points of your video if you wish to alter it.
Step 5:
When you’re finished, go to the top right corner of the screen and click the share symbol. You may either save your file to your computer or share it via social media or email from here.
")
Bonus: Learn how to quickly transform your screen recordings into professional videos.
Even if you’ve never edited a video before, you can turn your screen/camera recordings into professional videos that you can post on social media or include in your job presentations and business proposals in minutes using an online video editor like InVideo.
With InVideo, you may compose different footage, add text, background music, and more by following these simple steps:
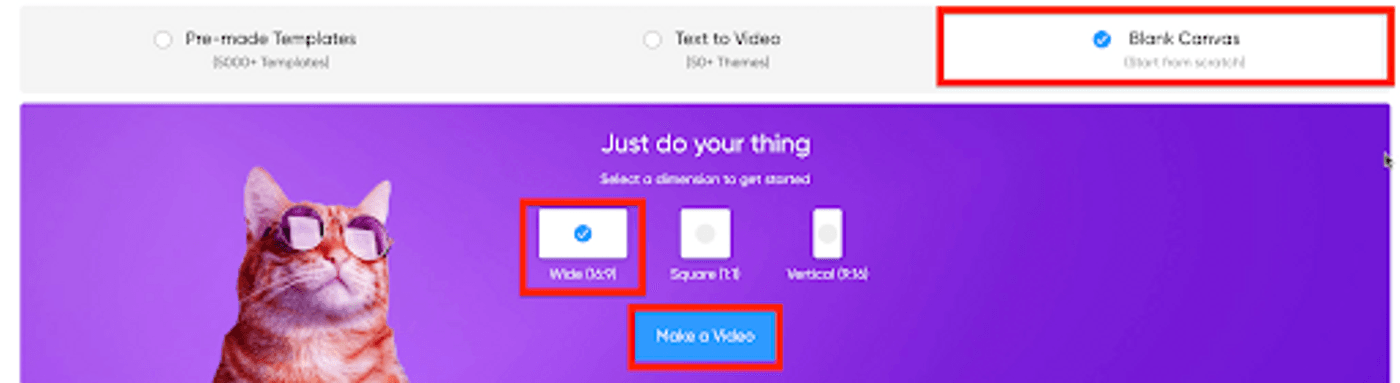
Step 1:
Create an InVideo account or log in to one you already have. For your Mac recorded video, pick “Blank Canvas” and 16:9 as the aspect ratio. To get started, click the “Make a video” option.
Step 2:
Open the InVideo editor and select “Upload Media” from the left panel to upload your screen recording or camera recorded clip.
")
Step 3:
Drag your video to the editor once it’s in the panel.
Step 4:
A popup to cut your video will appear. Use the slider to adjust the beginning and finish positions of your video.
Step 5:
If you want to combine different parts of the same video, click on the “Add section” to pick your preferred portion. When you’re done, click on “Save,” and your trimmed videos will get combined.
Step 6:
In the editor, select “Music” and either use InVideo’s library of genre-based sounds or upload your own audio to add music to your video.
Step 7:
You may also use a variety of typefaces to add text to your movie as a headline, subheading, or body text.
Step 8:
When you’re through editing the video, go to the top right corner and choose “Download & Share,” then “Export.”
")
Step 9:
After your export is complete, you can either save the video to your device or share it straight on social media.
")
Final thoughts
So that’s how simple it is to capture your Mac’s screen. Check out our post on how to record your iPhone’s screen if you want to learn how to do the same.
The IV community is also a great place to go if you want to learn more about video editing and creating. Join the community to engage with over 25k other creators while honing your abilities.


